Translate

Friday 30 December 2016

A few things to share...

Hello crafty peeps and welcome to my crafty nook! I am so sorry I've not added a blog post for over a month, I came back from the wedding terribly run down and ended up with a chest infection, then with Christmas looming, I just haven't had time to blog the few things I've made. To make matters worse I've come down with a really heavy cold over Christmas and I've lost my sense of smell and taste completely which has made me feel pretty miserable as you can imagine - all those lovely Christmas goodies and I can't taste (or smell!) a single one! My cold started on the 23rd and I'd lost my sense of smell and taste by the 24th and it's still not come back yet. For the first year ever, I made Christmas lunch for my mum and I (my husband chose to spend Christmas or at least the meal with his family at a pub!) and I couldn't even taste it - apparently it was very nice though. I'll have to try and re-create it when I'm better.

I thought I'd share a couple of Christmas cards I made earlier this month. For the second year running most of my friends and relatives haven't actually had a Christmas card off me but I'm planning on whipping up some simple Happy New Year cards to send out instead.

Penguin/Igloo card made for my Niece and Nephews

Close up of the Igloo

I call this penguin Charlie after my niece :) 

The boys :)

Jack the penguin

Liam the penguin

Ross the penguin with snowball

On thin ice...

I absolutely love the stamp set and embossing folder that came free with Papercraft Essentials magazine a couple of months ago, my subscription needs renewing so I ended up paying full price of £5.99 for the magazine but it is well worth it as it also included a little die set that cuts out three skates, the ear muffs (though these could be headphones as well) and the little bobble hat. You have to fussy cut the scarf and the actual characters but that's easy enough to do. As well as the penguin characters, there is a bear and a seal along with some accessories like a pile of snowballs and a sledge but I've only really used the penguins. Although this is a Christmas/winter set I can see it being used all the year through because it is very versatile. The little sprig of holly on Liam's head actually came from the embossed door/wreath cover gift that came out around September time - for the life of me though I can't remember which magazine it came free with . I kept the colouring fairly simple on this card and used a combination of ProMarkers and Kaiserfusion pens the latter only because I have a lot of icy colours in that brand whereas for some reason Promarkers don't seem to have many icy/frosty colours and it's boring always colouring ice the same tired blue or pale grey. I added Spectrum Noir Clear Shimmer Overlay to the igloo, ice pond and to other parts of the card. As always though it's rather hard to see the sparkle in a photo. I also added a bit of Woodware Fluffy Stuff to the bobble of a hat and the snowball in Ross the penguins hand for added texture. It's a thick liquid which fluffs up when you apply heat to it - a fantastic product that I'm always surprised isn't made more of in the crafting community (it's been out for years and I've had the same bottle for almost 8 years now because a little goes a long way.)

We Three Kings

Close up of card

I made this card using a die and embossing folder that came free with Die Cutting Essentials magazine. I'll admit that Die Cutting Essentials magazine is rather pricey at £9.99 but I found I was usually buying it online at more.mags.com at the full price plus postage so it made sense to start a subscription to the magazine. This die came with my first subbie copy and I really love it. I actually made around a dozen cards using the die but each one was slightly different as I used different ways to colour the background panel that goes behind the black die cut outline. My favourite ones were made using distress ink and blending three colours together in an ombre effect but I was very pleased with how this watercolour panel piece came out using Karetake Gansai Tambi Watercolours, I used a heat gun to speed the drying process up and it caused the watercolours to run which I rather like as it looks as though there are tongues of flame in the sky which is rather dramatic. Probably the hardest thing about making this card is sticking down the diecut to the back panel just because some of the design is rather delicate but a steady hand and a glue pen soon solved that.

It'll be rather a shame to put away the Three Kings die once the Christmas period is well and truly over as I had a lot of fun experimenting with different backgrounds. The penguin set will be staying out in my regular stash as I'm sure I'll be able to use it for other non Christmassy cards during the year - not least because I've recently found out that my sister's OH loves penguins! (That's the theme for his next card sorted!)

I really want to improve my blog during 2017 and grow my audience so one thing I do need to tackle is the frequency of blog posts. Until I can save for a decent digital camera, my photos are still going to remain a little on the poor side but I hope you my lovely reader (s) will look past that and continue to support my blog as it develops and grows. It would be fantastic if you could become a follower by clicking the follow button in the side bar or by subscribing via email. As always I would love to hear your questions and comments so feel free to leave them in the usual places.

I hope you all had a brilliant Christmas and I wish you all a healthy and prosperous New Year. Until next time - keep crafting!

Love and crafty hugs,

Sarah xxx

Sunday 27 November 2016

Purple Wedding Card

Hello crafty peeps and welcome to my crafty nook!  The best man from our wedding and Chris's best friend Les married his long term partner Jill yesterday (though as I write it's actually Monday the 21st not Sunday the 27th!) By the time you read this post the wedding will be over though the reception might be ongoing *winks*. Hopefully though I'll actually be tucked up in bed getting some sleep before facing travelling back to Bridlington from Leeds (Otley doesn't have a train station). Obviously as I've been super organised and have written this blog in advance and set a schedule for it to be posted, I've no idea how the wedding has actually gone but I'm sure it went well. Chris is the joint best man and I'm planning on helping him with his speech later this week but he's very nervous about making it bless him. I'll admit to be rather nervous myself, I'm not good at meeting new people and I've only met Les twice (at the wedding and he came to our flat for a few hours last year) and I've only met Jill once very briefly at our wedding five years ago. It'll be challenging being in a room full of strangers while Chris goes about his best man dues but I shall face my fears and enjoy myself. At the very least it's been the perfect excuse to make a wedding card (I don't go to many weddings) and I've treated myself to a couple of new wedding themed goodies to make it too - bonus!


I love this purple that's become very popular for weddings in the last few years and it's the perfect colour for a late autumn/early winter wedding. To be honest I wasn't sure if purple was the wedding theme colour as the invite had purple hearts and pink hearts on the front but I checked with Jill and it turned out to be mainly purple (which I'm glad about as there were a lot of shades of pink on the invite which may have been tricky to match). The purple card for the card blank and the diecut gazebo and sentiment piece are Centura Pearl cardstock from the darks collection. I love the rich colour and shimmery effect when you tilt it to the light. I also used some Centura Pearl white card with a hint of silver shimmer finish to it for the inlaid die cut pieces of the gazebo and the bride and groom die cut piece. The groom was also cut out using a scrap of black card and cut to the right shape for his suit, shoes and hair (the hair looks a bit strange though!) The stitched oval dies and the wedding dies are all new purchases from eBay and came from China. They are so cheap that it's jaw dropping, the wedding set was only £2.11 and the gazebo is 5" by 4"! I'm not sure how much  the nesting stitched ovals were but they were less than £2.50 and there are 5 sizes altogether. The other card came from a mixed pack of larger than A5 card from Tattered Lace. The bow was made with one of the thinner cards using a die that came free with a magazine sometime this year and I added some Papermania gem bling to highlight certain areas of the card because who doesn't like a bit of bling? I used a couple of Flexmarkers to colour the bride and groom. The sentiments are from a Crafter's Companion Sara's Signature Wedding Collection stamp set and the silver printed vellum came from a gold and silver mixed pack of vellum from the same collection. I think how this card was made is pretty self explanatory so I won't go into details apart from saying that the the Gazebo die was die cut twice once in purple and once in white. I added double sided tape to the main parts of the white outline and kept the purple version in the die so I could poke the negative pieces out individually to place in the relative space on the white version until all the spaces were filled. It's a lot easier to do it this way rather than just poking them all out at once and trying to guess what belongs where.

I'm really pleased with how this card turned out, it wasn't at all how I'd imagined when I was in the planning stage but I love the beautiful gazebo and how it looks cut out in Centura Pearl card. Fingers crossed the weather will have improved for the wedding as the venue is set in 45 acres (I think!) of beautiful woodlands and it would be a shame if the couple didn't manage to get some outdoor photos due to either the rain or boggy conditions. Although I won't be able to see much of the area it'll be quite pleasant to go back to Otley as I used to live quite close to it as a young child.

Hopefully I'll have a few more cards to share with you when I get back (may need a day or two to recover though!) so I hope you'll keep an eye out for a new blog post soon. As always if you have any questions or comments then please leave them in the usual places and I'll try to respond within a few days if required. I hope you all have a brilliant Sunday and until next time - keep crafting!

Love and crafty hugs,

Sarah xxx

Sunday 20 November 2016

A Peek a Boo Flip Card and a bit of a life update

Hello crafty peeps and welcome to my crafty nook! Wow I can't believe its been more than two weeks since my last blog post, I'm really sorry I've not posted more regularly but as usual life has got in the way and although I have been crafting I haven't found the time to actually blog about it. I seem to be spending a lot of my time on the phone to Practical Publishing at the moment trying to get my subscriptions for craft magazines sorted out. Ever since they stopped publishing Simply Homemade magazine I've had problems with my subscriptions, it's a long complicated and probably boring story so I'm not going to get into it here but I'm in the process of setting up yet another direct debit for Papercraft Essentials magazine using a hard copy of the Direct Debit Mandate in the hope that it actually works seeing as though doing it via the subscription line (telephone) isn't working. It's a bit annoying because it means my quarterly subscription price is increasing but on the bright side I will be getting a new subbie gift. I'll be enclosing a strongly worded letter explaining that if I don't receive the magazine when it is due (they keep turning up late or not at all!) then I'll be forced to cancel all my subscriptions with them and as there are around 5 from that company, it's a significant amount of business they'll be losing. As much as I love my craft magazines, I can't cope with the stress of trying to actually get the copies I've paid for and it's detrimental to my mental well-being (I actually cried when I got off the phone on Friday because the customer care advisor was so unhelpful!) and I'd rather go without them then continue the way things have been for the past four months.

Other bits of news I'm STILL trying to get my entry in for the Papercraft Magazines Designer of The Year 2016, the deadline is 13th of December so I've only got a few weeks to get it made and sent off. Ironically the competition is run by Practical Publishing which may have something to do with my comp craft block - I think that I've got a subconscious mental block making me reluctant to actually make two cards and a project because I'm not happy with Practical Publishing and I'm 'punishing' them! Lol I could just be procrastinating as usual though. Things aren't helped by the fact that unlike previous years, you can't send a self addressed returns box to get you your items back so I'm not wanting to make something I really love and lavish my precious time and crafty resources on if it's just going to end up in the bin - it's not like they are being donated to charity either like the last competition (winners still haven't been announced!) because you have to put your details on the back of each item which makes it an even bigger waste. It's getting to the point when I'm wondering if I should even bother entering especially as I've so many other crafty projects needing my time (Christmas is a-coming!) How are your crafty Christmas plans going?

Anyway enough of my woes and life lets get onto the important things - crafting! I recently watched a Youtube tutorial by Meg Loven for a peek a boo flip card which I really wanted to make. I didn't have a 2" punch only a 1 1/2" punch so mine's not quite the same as Meg's but I really love how it turned out. Here is a link to Meg's tutorial https://www.youtube.com/watch?v=V54wCQtZsY4  - there is no point me re-doing the work that Meg has done so concisely on her video so I'll just share the supplies I used after the photos of the card.


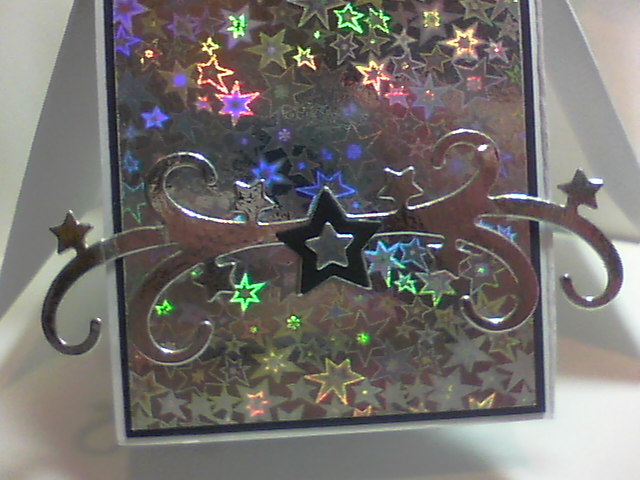
The papers were from a DoCrafts Birthday party A4 Paper collection and the star and pink 'twirls' are stamps taken from a Sara Signature stamp set, the Happy Birthday banner is a Die-mond stamp and die set again from Crafter's Companion and the Happy Birthday that's revealed when the card is opened also came from the first stamp set but was masked off as it's actually sandwiched between a cake and it's stand. I used Brilliance ink for the star and 'twirl' stamping and Memento Tuxedo black ink for everything else. The 3D balloons were die cut using a free die from a magazine. I left the inside lower right panel blank for my message.

This card is for my lovely friend Jean who celebrates her birthday next weekend. I really hope she likes it. We are at a wedding next weekend so my mum is cat and flat sitting for us, it's also my sister-in-law's birthday so I need to make cards for both occasions, luckily I've been super organised this year and have had Sue's birthday present for a couple of months which I just need to wrap. I also want to give the flat a pre-maternal visit cleaning blitz. I readily admit that cleaning takes second place to crafting, reading, watching paint dry etc etc just because by its very nature it is tedious and never ending (especially with a blind husband who has enough sight to watch box sets (admittedly very close to the tv screen) but not enough to clean the toilet etc) and our flat is rarely "visitor ready"  but I have been trying a lot harder recently (since our boiler was inspected as a matter of fact) to keep on top of things and though it's kind of a waste of time straightening the lounge before I go to bed at the moment because it's a test series which starts at 4am (which is why I'm writing this at 2am - I need to wake Chris up at 4am so sleep is pointless for me until after that) and Chris never leaves the lounge the way he finds it, I do make sure the kitchen is decent before I sleep. Phew that was a long sentence and here was I promising not to bore you again with life stuff! I suppose my point is don't be surprised if this is the last blog post of November as I have a very busy week ahead and lots to prepare before December busyness starts in a week or two. I might just shock myself by being super organised and blogging in advance with a scheduled post going up next weekend featuring the wedding card but don't expect it as I'd hate to disappoint you *wink*.

Well this has been a very long post, well done if you've made it to the end. As always if you have any questions then please leave them in the usual places and don't forget to check out Meg Loven on Youtube. My next kinetic card challenge is to make a Twist and pop card (have a look on YT for an idea of what one is) I've been fascinated with this style of card for a few months but most tutorials are either confusing or in imperial measurements which need scorelines in 1/8" increments which is really hard to do on a Hougie Board because the inches side goes up in half inches and the metric side is in metric and they don't always line up perfectly. Still I enjoy a challenge especially ones I set myself. Hopefully I'll have a twist and pop card ready to share with you in a week or so and until next time - keep crafting!

Love and crafty hugs,

Sarah xxx

Friday 4 November 2016

We will Rock You (a rocker card and a scarecrow card)

Hello crafty peeps and welcome to my crafty nook! I hope you are all well and had a good weekend last week and are looking forward to this one. Sorry it's been a while since I added a post, it's been a busy week or so. I've got a couple of cards to share with you today which I made for my niece's 2nd birthday last week.


This was my first time making a rocker card from scratch and it took me nearly 5 hours in total because things kept going wrong. I don't own any large circle dies (biggest is about 4") so I had to draw around circular objects and cut them out. To be honest I do own  a Fiskars circles shape and cut but like a lot of craft items, it isn't designed for left handed people and the blade actually falls out of the housing as I try to cut around the circles - still the circle templates themselves come in useful for drawing round even if that's not their intended purpose. I really love the Tiny Tatty Teddy Girl Die that I bought from The Works about a month ago, the die set is £10 at The Works but they were having a 25% flash sale so I bagged myself a bargain. If you are in the UK and have a store near you then it's well worth signing up for their newsletter as they have money off codes regularly, if you spend over £20 you can get free delivery but they have a free click and collect option if you spend under that and don't want to pay £2.99 postage. The TTT girl bear die embosses as it die cuts so all the detail you can see on the bear comes from that and I went over it with a black glaze pen. I cut it out using a pale grey card and coloured it in using Flexmarkers. I added a die cut bow and highlighted the bear and bow with Dovecraft Glitter glue in either Rose, Topaz or Clear. I added some die cut balloons to some acetate and wrapped baker's twine around it before adding a mini tag to weigh them down. The acetate means the balloons float above the card (makes it difficult to find an envelope for it to go into though).


My second card featured a scarecrow with die cut clouds and a distressed ink background. The stamp set came from Buddly Crafts and I can't recall the brand but I think it may be Kars. The images in this set are very cute and I fussy cut around the scarecrow and hill scene and added it to a panel of distress inked card stock. If I'd used my brain then it would have been easier to stamp the scene first and cut it out and stamp the scarecrow separately instead of trying to fussy cut it all in one go. The clouds were made using a Sara's Signature die and I ran it through a paper crimper before rubbing over the clouds with a bit of distress ink left on the sponge applicator from colouring the sky.

I hope you like my latest creations, I've been taking part in a colouring challenge and I'll have more details on this in my next post. As always if you have any questions or comments then please leave them in the usual places and until next time - keep crafting!

Love and crafty hugs,

Sarah xxx

Friday 21 October 2016

Charlie's Cards (a little later than planned - sorry)

Hello crafty peeps and welcome to my crafty nook! I hope you are all well and looking forward to another crafty (or non-crafty) weekend. This post is a little later than promised, I'm not sure where this week's gone again.

I made two cards for Charlie - the first card was loosely based on one my sister shared with me on Facebook months ago, I couldn't actually find the photo of the card but had sort of an idea what it looked like.


This isn't the easiest card to photograph as it's mostly black on black. I stuck Sizzix number dies onto a piece of Centura Pearl card stock in a random pattern using washi tape and ran it through my Big Shot using a metal Precision adapter plate to ensure a crisp clean cut first time, then moved some of the numbers on the card while leaving a couple off. I made sure I kept the negative pieces of the numbers as I wanted to make a feature of the negative numbers rather than the die cut positive numbers. Once I had all the numbers I wanted cut out I added pieces of foam tape to the back of the card making sure I used plenty near but not covering the negative number spaces. I added a small scrap of pink holographic card to the 18, flipped the card over and added the interior negative pieces so the 8 was complete using small pieces of foam tape. I added some d/s tape to the back of the 18 and added the entire panel to another piece of black card stock. I added all the saved negative diecuts inside of the relative numbers as shown using more foam tape. I wanted to add some white splatters just to make the card a little more interesting so mixed a small quantity of Tonic Nuvo white acrylic paint with some DoCrafts white shimmer spray on a spare piece of acetate and flicked it onto the card front using a paint brush. I ended up with two large drops so dabbed them up using a piece of kitchen paper and it left a galaxy sort of pattern near the 18 which I rather liked. I added to the spacey feel by adding dots of white gel pen and Sakura Clear Stardust gel pen randomly to the card. It would have been a good idea to have added the Happy Birthday sentiment before I added any foam tape to the piece but luckily it was stable enough for me to stamp onto it using Versamark clear ink and then heat embossing using a detail white embossing powder. Once I was happy with the front panel, I added it to a card blank. Although this was made for a young lady it would be very easy to change it for a young man just by swapping the pink card under the 18 for another colour - you could also easily change the age for a different significant birthday.

The second card is one of my beloved pop up box cards and I loved making the last one so much that I decided to make a similar one using different star dies.


The card base was made using Centura Pearl black card stock which is black on one side and white on the other which is why the top flaps of the box card are white while the box parts are black. I die cut the star shapes out of the black card, pink holographic and silver mirror card and the 18s were also die cut out of the pink holographic card. This card was extra large so I had to make a custom envelope for it using my WRMK Envelope Punch Board and a sheet of 12" x 12" paper (punched and scored at 4 1/2 ")  I really liked making this card and it certainly has that wow factor.

I've made these box cards loads of times so there are instructions somewhere on this blog. If you can't find them then please leave a comment below and I'd be delighted to write them out again. I've a card to make for one of my other niece's Isobel who will be celebrating her 2nd birthday on Thursday. I'm considering making a rocker card with balloons floating above using acetate but nothing's definite at this point. I hope you've enjoying seeing my (sort of) latest creations, I had a lot of fun making them and they seemed to go down well last Sunday. It was really wonderful to share Charlie's special birthday and it was fantastic to see my sister's family and spend some quality time with them.

I hope you all have a brilliant weekend and until next time - keep crafting!

Love and crafty hugs,

Sarah xxx


Sunday 16 October 2016

Happy 18th Birthday Charlie and some spooky milk cartons

Hello crafty peeps and welcome to my crafty nook! Today is a very special day as my niece Charlie turns 18! I don't see my sister and her kids as often as I'd like so I'm making the most out of seeing them today by taking an early Halloween treat for her kids that still live at home. I fell in love with the milk carton embossing board that came free with one of my magazines last year so I decided to get it out again and make some spooky milk cartons filled with Halloween treats. I don't celebrate Halloween so apart from one stamp set that I bought during a Clearly Besotted Stamps sale and a skeleton die from Crafters' Companion, I don't own a  lot in the theme of Halloween. Luckily I do have lots of different coloured card stock and I must confess to a sneaky purchase on ebay of a spider web die, so with a little imagination I've come up with these.


All the milk cartons are a variation of the theme but I did change things a little bit more for the birthday girl - I used Centura Pearl card and black fabric glitter tape for that added bit of bling and embossed the scary face and BOO! using white detailed embossing powder instead of stamping in black. I coloured the tiny skull pegs using a black flexmarker and added details (stripes and dots) using a white gel pen. Since taking the photos I have coloured in the naked skull peg to match the others. I added some cheap pearl effects which actually flattened out instead of staying 3D (lesson learnt!) but apart from that, I'm pleased with how they've come out. Hopefully the kids will like them as much as I did making them.

I've made a couple of cards for Charlie which I'll be sharing with you tomorrow all being well - I want the birthday girl to see the cards first. As always if you have any questions or comments then please leave them in the usual places. I hope you all have a wonderful Sunday. Until next time - keep crafting!

Love and crafty hugs,

Sarah xxx

Thursday 6 October 2016

60th Pop Up Box Card

Hello crafty peeps and welcome to my crafty nook! I hope you're all having a brilliant week, it's nearly the weekend so that means lots of crafty goodness to look forward to. I had my best friend Adam and his lovely wife Victoria stop by for a visit on Monday on the way to celebrate Adam's mum's 60th birthday. Perfect timing as it meant I could get Adam to hand deliver the card I'd made for her rather than sending it through the post. For such a significant birthday I decided to make one of my favourite styles of card - a pop up box card. Ros is such a star that it seemed appropriate to make her a box full of them with die cut 60s floating amongst them.


I used a set of star dies from Xcut which I got in a recent order from Every Craft's A Pound. ECAP have got a shiny new website with lots of new features and although not all items are just a pound, they remain fantastic value not least as you now get free P&P on orders over £30. This die set was only £3.00. The numbers were cut out using a die from Sizzix which didn't come from ECAP - unfortunately. I die cut the stars out of black card and silver mirror card and the numbers were diecut out of holographic card. The top flaps of the box were matted and layered using the black card and some rather lush holographic stars card which went perfectly with the star theme. The sides of the box under the flaps were matted and layered with black card and plain silver card except for the front panel which had white card for the top layer so I could write my birthday message.

Apparently there's a trick to make the box pop open as soon as it comes out of the envelope involving a rubber band but I've not come across instructions on how to get it to work. If I find them or manage to work out how to do it on my own then I'll share it here on my blog.

My next big event is my niece Charlie's 18th birthday on the 16th - I can't believe she's an adult, it doesn't feel like five minutes since she was flashing her bum at the security cameras at the local bank (she was only a toddler at the time I should point out!) For years I waited for it to appear on "You've Been Framed" (I've never done a search on YouTube though!!) but luckily it hasn't so far. Enough of niece bashing (lol) I'm thinking about making a similar sort of card for Charlie but with 18s instead of 60s. I don't usually get the opportunity to see my sister's kids on their birthdays so try to keep their cards postable (if you know what I mean), as I'll be seeing Charlie on her birthday, I'll be able to make her card as bulky as I want without worrying about how much it'll cost to send or it getting damaged in the post. It gives me lots of options on what sort of card to make so I may make several versions on the run up to her birthday.

I hope you like my latest make, as always if you have any questions or comments then please leave them in the usual places. I hope you all have abrilliant weekend and until next time - keep crafting!

Love and crafty hugs,

Sarah xxx


Wednesday 28 September 2016

Get Well Soon Sis

Hello crafty peeps and welcome to my crafty nook! I hope you've all had a brilliant weekend, it's been rather quiet in my crafty nook though I have been making a few sneaky purchases on Ebay and similar. I've managed to order the stitched border dies again from a different ebay seller after my first order had to be cancelled due to it being returned back to the seller by the Chinese Customs! (I suspect a porkie or two was put on the declaration which is daft as dies aren't contraband!) It'll be a while before they arrive but the anticipation of getting an order is almost as good for me as actually getting the craft goodies. I've become ever so slightly addicted to a new to me YouTuber called CRaFTiPoTeNTiAL - if anyone checks out my YouTube history they'll stage an intervention and make me join a self help group for cyber stalking lol. Seriously though this woman is amazing, she uses things in an innovative way (my jaw dropped when I saw what she did using the shaving foam technique with her own personal twist!) and more importantly she gets the same magazines as I subscribe to and makes amazing cards with them. To my shame I more often than not look at the free gift and think wow that's great and then it rarely sees the light of day again. Now thanks to CRaFTiPoTeNTiAL and one of my other favourite YouTubers, Christina Griffiths I'm inspired to take a fresh approach to my craft freebies. I hope that wasn't too gushing - I'll admit to having a bit of a craft crush lol. Here is a link to one of her videos where she uses free gifts from a variety of craft magazines in an unexpected way https://www.youtube.com/watch?v=L6FREUaEmWw

Enough of my craft crush - here is my latest card, a split panel Get Well Soon card for my sister Teresa who's recovering from having knee surgery yesterday. Hopefully she'll be home tomorrow and will get my card through the post in a day or two.


I've made these cards quite often so I'm not going to rehash how to make them, unless anyone is interested in more details. I used a Tatty Teddy chipboard embellishment which I got free with a magazine many moons ago, it also came with a 6" x 6" paper pack and I used some blue and pink spotted paper from the pack to decorate the horizontal panels. The vertical panel was originally plain white card stock but I coloured it with a Cool Shadow Copic marker (I now own two Copics!) I added a few layers of the marker until I had a nice smooth coverage and I added dots with a white gel pen and a Stardust gel pen. I also added dots of the stardust to the centre of the flowers and added black glaze gel pen to Tatty's eyes - I think the eyes  look a bit sinister now lol not exactly the look I was going for! I added some silver thread behind the topper before adding the embellishment to the green panel of card. I really like the effect of putting the thread behind things and it's been something I've wanted to try for a while. I added the sentiments to the inside of the card and decorated it with stamped stars which I coloured using the Cool Shadow Copic marker. I added Clear Spectrum Noir Shimmer marker to the stars and glossy accents to the inner ones.

I hope you like my latest creation and I wish my sister a speedy recovery. It's my niece's 18th Birthday in a couple of weeks time so I'm really hoping she'll be on the mend by then. It would be a strange coincidence if Teresa ended up being in a wheelchair post surgery for her daughter's 18th just like our mum was for hers! *cue Outer Limits or similar music*

As always please leave me any questions or comments in the usual places and I'll get back to you if appropriate. I hope you all have a brilliant rest of the week and I'll be back soon. Until next time - keep crafting!

Love and crafty hugs,

Sarah xxx