Translate

Friday 29 December 2017

A belated Merry Christmas and an early Happy New Year!

Hello crafty peeps and welcome to my crafty nook! I hope you've all had a brilliant Christmas so far and are enjoying the snow if you have been 'blessed' by it! I love it when it snows as long as I get to stay cosy and warm inside lol. We haven't had any this time but it's still rather cold and I am very grateful for the new central heating system even if it did cause a lot of mayhem having it fitted a few months back. It's been a quiet but exciting Christmas for us here in my crafty nook. It started with some sad news - Quick Card Made Easy announced on Facebook that their January issue of the magazine would be the very last. I think I've got the very first issue or at least  some of the very first of the publication in a cupboard, I probably haven't got every issue as I missed some when I damaged my back about ten years ago and I wasn't able to get to the newsagents to buy QCME but I have been subscribing ever since (some may have got lost or damaged during various moves too) so it's an end of an era really. It's made even more poignant by the fact I've finally got to take part in the sketch challenge (I've been applying for nearly a year!) and my card is featured on page 69. The magazine went on sale yesterday and it would be great if as many people as possible purchase the magazine not just because my card is in it (though feel free to do so - I'd be incredibly flattered!) but to show our support of a wonderful publication that has given years of inspiration and helped me (certainly) and many others become better crafters - who knows if enough new people buy the magazine then they may change their mind and start it up again.

As usual, I was making cards until Christmas Eve but I think most people actually got Christmas cards made by me (though they may not have got them yet - I was late posting them!) and those who didn't will hopefully be getting New Year's cards instead. Christmas was a quiet affair at home with just my husband, my mum and I enjoying a roast chicken with the trimmings. Things took a bit longer to make then expected and in the rush to get down to the taxi in time, my mum didn't put her glasses away properly and has now lost them - I think she kind of blames me for not being more organised with the meal because she was decidedly frosty with me when I rang her this evening. I've not felt very well since Christmas Day - no I didn't give myself food poisoning though I may have over indulged when it came to the stuffing! - so I've not done much apart from feeling sorry for myself. I've not even been online that much and as a result I didn't find out my youngest niece on my side of the family finally had her baby girl on the 27th December (she was due on the 16th!) Isabella-Rose (isn't that a lovely name) is beautiful and is my second great-niece born this year!

One of my best presents (and I got some great presents this year) was from my lovely mum and dad-in-law who bought me a gorgeous Polaroid iG128 digital camera (purple one of my favourite colours!) so I've no longer any excuse if my cards look rubbish on this blog - yep the card's naff, it's not down to my old camera anymore - saying that the photos I'll be sharing soon were taken using my old camera because (a) most were made before Christmas and (b) I've not been able to use it before now because it won't take photos without a memory card (now purchased and installed). I may still use my old camera from time to time but that's just because I can charge it via a USB whereas my new camera requires AAA batteries and I've a feeling it maybe a bit of a battery hog - I may have to buy a charger and re-chargeable batteries if it goes through them quickly. I'm hoping to make YouTube video tutorials but not sure at this point as I couldn't get the sound on the video playback on the camera, it might not have sound on the camera but does once it's uploaded, I'll just have to wait and see. I'll also have to rig something up in my crudy (challenging as there isn't much space!)

Here are a selection of my recent cards including Christmas cards, Baby's first Christmas card, birthday cards and A New Baby card. As this is already a huge post I won't be adding any details - if you are curious about products or methods used then please leave a comment in the usual place.


These are only about half the cards I made because I didn't take photos of the rest of them. I think my favourite of this lot is the 10th birthday card I made for my nephew who turned 10 today (29th December), it's always a bit hit or miss making sure he gets his card on time because of the Christmas post so I was extra pleased that he got in time for his birthday. I'm not sure if he does like to dress up as a robot but I bought this Personal Expressions stamp with him in mind about six months ago. I did try to colour it in using metallic pencils on kraft card but preferred it on white card and using ProMarkers. I used the kraft piece to make a pocket inside to hide some money - I know you're not supposed to send money through the post but a bank transfer to his mum's account seems a bit impersonal (yes I know money is too but at least it's there for him on the actual day - better than waiting until he sees me in person!) Anyway it got to him ok and I think he likes the card. Charlie hasn't got the card from us for Isabella-Rose so it's a bit naughty of me to share it on here but tbh I don't think Charlie reads this blog so she won't see it before it arrives at her home.

I hope you've enjoyed my latest makes, sorry it's been so long since I've added a blog post, the run up to Christmas always goes so quickly and I've not really had time to blog until now. Hopefully now the Christmas frenzy is over for another year (but this isn't the last of my Christmas makes - I'm going to make at least two Christmas cards a month!) I should have time to blog more often and with my snazzy new camera, I don't have any excuses! If you have any questions or comments then please leave them in the usual places and until next time - keep crafting!

Love and crafty hugs,

Sarah xxx

Saturday 9 December 2017

A card to share...

Hello crafty peeps and welcome to my crafty nook! I hope you've all had a brilliant week and are ready for a cold weekend ahead - at least the wintery weather is a good excuse to stay indoors and do some crafting. Well so much for my plan to make and share a card every day using the dies from my Crafter's Companion advent calendar - I forgot to take one little thing into consideration when I made that plan - I don't actually like a lot of the dies that came free, eek! In themselves they are quite sweet but most of them are really not to my taste, are quite small and fiddly to use because they have lots of die cut inlaid parts to them like bows and things, and I couldn't even work out what the die was on day two (I thought it was a pineapple to begin with!). There are a few dies that I probably will use, a flower garland, a very pretty butterfly and the word 'celebrate' but the first die the snowflake remains my favourite up to the 8th anyway. I've not really had a lot of time this week to make Christmas cards because I've been concentrating on making a steampunk Gorjuss Girls card for my sister who celebrates her birthday tomorrow. It probably doesn't look like it but her card took me around 3 days to make on and off mainly because there was a lot of die cutting involved.


The images are from 'The Hatter' Gorjuss Girls stamp set and they were stamped onto Sheena's Stamping card using Memento Tuxedo Black ink and coloured in with Pro Markers. The top hat and hearts were diecut out of the same card stock and coloured in with Pro Markers. The hat was die cut four times before being layered together with wet glue to form a thick embellishment - the gears on the hat were die cut from the same card and coloured with Papermania Metallic markers. The gems were added using blobs of wet glue to keep them in place. All the other die cut gears and cogs were cut out of scraps of holographic and plain silver card. The flowers were die cut out of the white card and coloured with Pro Markers (crimson and burgundy). The 6" square card front was made using white card ( Bristol Board in this particular case) and ink blended with Fired Brick Distress Ink and Black Soot Distress Ink, it was further distressed using a distress spray bottle. The card blank is a twisted easel card blank from Every Craft's A Pound, £1 for a pack of 3 with envelopes, they aren't quite 6" square so the front piece over hangs at one side and at the top.

I really like this card and it looks a lot better in real life (my camera is really rubbish!) I just hope my sister likes it. As always if you have any comments or questions then please leave them in the usual places and until next time - happy crafting!

Love and crafty hugs,

Sarah xxx


Friday 1 December 2017

On the first day of December Crafter's Companion gave to me...

Hello crafty peeps and welcome to my crafty nook! I hope you have all had a good week - hasn't December come around fast! We had snow yesterday (in fact our town made the 6 o'clock news on the BBC) but most of it has vanished after a spell of heavy rain.

Yesterday I was thrilled to receive an unexpected gift from Crafter's Companion - an Advent calendar! I love Advent Calendars but I don't tend to buy them just for me, so I was especially pleased to have one filled with small dies and not the usual chocolate - though crafting and crafting do tend to go together well.


What's behind door No.1?

A pretty snowflake die! 

Here are three cards I made using the lovely snowflake die that was behind door number 1.


The first two cards are both A6 in size and although they are very similar there are a couple of differences. The blue square panels were made using a Woodware square punch and I punched out three squares for each card out of blue star holographic card (1) and blue glitter card (2). The snowflakes were die cut out using the first free die from the Advent calendar and one is of plain silver card while the other two are diecut out of holographic card. The snowflakes were adhered to the square panels using wet glue and a gem was added to the centres to finish them off. The A6 card blanks were made from a hint of silver Centura Pearl cardstock. The sentiment is one from a stamp set from my stash and was stamped onto Sheena's Stamping card using Versafine Onyx Black ink before being cut out with a fishtail banner die. The panels were added to the card blanks as shown using d/s foam pads and the sentiments were either added flat or using thin foam tape. I added 3 cup sequins to one card and 3 flat sequins with gem centres to the other.

The tall skinny card was made using the same supplies but I used Sheena's Stamping card for the card base (4 1/4" x 7") and flicked dark blue Spectrum Noir Shimmer brush marker over it first. I heat set the splatters before adding the square panels. On this card there are two holographic squares with plain silver snowflakes and one glitter square with a holographic snowflake in the centre. I added three flat sequins and clear gems as shown along with a sentiment.

I hope you like my latest makes - I love this snowflake die (it's my favourite from the Advent calendar so far lol) and I'm really pleased with the cards I made using it. It doesn't use alot of supplies and in fact apart from the card blanks, everything was made using scraps of card so it's a good way of using up those scraps that end up taking so much room! This card style is a good one for making lots of cards because you can make them in batches and either keep them identical or ring the changes with a few additions such as sequins, gems or even splatters. If you do add splatters make sure they are totally dry because it is very frustrating to nearly finish a card only to realise you've smudged it.

I've no idea what else is in my lovely Advent calendar and I'm hoping to share a card made using the contents each day up to Christmas Day (there are 25 windows to open but I can't promise to have time to make a card every day and it's especially doubtful on Christmas Day itself as I'll be busy cooking lunch for my mum, husband and myself) hopefully I will have shared lots of quick makes perfect for anyone else who's as unorganised as I am this year (and last year, and the year before that...) before the big day itself.

As always if you have any questions or comments then please leave them in the usual places and until next time - keep crafting!

Love and crafty hugs,

Sarah xxx

Wednesday 22 November 2017

News, Reviews and winter blues...

Hello crafty peeps and welcome to my crafty nook! I hope you are all having a good week, it's very dull and gloomy here on the Yorkshire Coast and as so often happens it's having a detrimental effect on my mood. I'm feeling very 'meh' at the moment and as a result I'm not done a great deal of crafting (in fact I've not finished a single card/project). I have pretty much got everything back in my crudy though it was a bit of a tight squeeze as the new radiators are further out then the original ones and I've not been able to put things back as they originally were. I'm actually quite pleased about that though because I prefer the way I have it now as it's a little more streamlined. Lol - if anyone apart from me went in there I doubt they'd notice the 'streamlined' areas because it's still very cluttered and unless I have a major personal paradigm shift, it's always going to be that way. The fact of the matter is I like clutter, I find it very comforting to have a lot of stuff around me whether it be books, cushions or craft stuff. It's true I'm not the best housewife (is there anything more tedious or repetitive than cleaning??) and perhaps if I had less stuff it would be easier to keep clean (I really hate dusting which is strange because pre marriage I loved it!) but the thought of going down the KonMari route (do I love my iron - no but that doesn't mean I don't need it ffs!!) or even worse the 'Gentle Art of Swedish Death Cleaning' (have you heard about that?? Decluttering your stuff, leaving the bare minimum so your loved ones don't have to deal with your 'mess' once your dead. Okay so I'm supposed to not be surrounded by things that make me happy just so someone else doesn't have to deal?? *rolls eyes* honestly has no one heard of house clearance firms??) I'm not saying don't declutter is that's what you want to do but I'm getting a bit fed up of having minimalism shoved down my throat, if you have lots of spare cash (and does anyone these days??) then maybe getting rid of things you've not used in a year or that 'fills you with joy when you see/touch/think about it' is workable but sometimes it's better to have something and not need it then to need something and not have it - plus my personal motto is probably 'Be Prepared'  (Thank you Brown Owl. And Lord Baden Powell of course!). For example I might not use my electric drill from one year to the next but that doesn't mean I should get rid of it - if I need a drill the last thing I'd want to do is go to the expense of buying another one or try to borrow one (what if there were a Zombie Apocalypse or alien invasion and I needed to seal off the windows and doors with planks of wood - good luck doing that without a drill! - hmm unlikely it's true but it's better to be prepared just in case *winks* - I may read too many trashy novels and/or watch too much trashy TV!). Oddments of paint - that's another thing I wouldn't want to get rid off and it's a good job I haven't! I'm not sure if it was deliberate but the plumber fitting the radiators managed to get every single one only nearly but not quite in the exact spot as the original and because they are all further out then the first ones, it's left an unpainted area around most of radiators that is very noticeable especially in the bathroom and lounge. Now at some point we'll have to strip the wallpaper off in the bathroom and redecorate because it's just bare wall around the radiator now but because I saved the paint from the lounge when it was decorated (assuming it hasn't dried out, it has been quite a while!) I'll be able to repaint around the radiator once I've got my motivation back (just can't be bothered right now tbh!) - if I hadn't kept the paint or if I decided to follow the KonMari method I would have to redecorate the entire room a huge undertaking, instead of painting a small area - so in your face KonMari!! (No offense meant to either Marie Kondo or her many followers, if that's the path that sparks you with joy then good for you but it's probably always going to leave me cold - minimalism seems a bit soulless and not very welcoming to me but that could be because I've felt as though my very presence clutters up the 'perfection' and I personally like my home to feel welcoming and that it's okay to relax on the sofas, not be afraid to ruffle up the cushions if you rest against them!) Well that's been cathartic - thank you for reading so far *winks*.

My title said 'Reviews' but really it's news about reviews rather than actual reviews! I was asked to review some craft magazines recently for Practical Publishing which I thoroughly enjoyed even though I actually subscribe to all three publications I was sent so I shall be doing a bit of a giveaway in the near future (certainly before the beginning of the new year) because obviously I don't need two sets of free gifts though I will be total honest and say that I am keeping the set of Kaisercraft papers that came free with one of them because I really like them and they are double sided so having two sets means I can use both sides *big grin*. One of the magazines also had a 'free' copy of Cards & Crafts For Christmas magazine but the majority of the projects featured the free gifts that weren't included with the 'free' copy so I wasn't planning on including it with the giveaway because I'm not sure how much use you'd get out of it sans the freebies but I'll keep it and allow the winner to decide. I'm also not going to include the magazines themselves as I've already put them into recycling and they're emptying that bin today. so that's a bit of a heads up for anyone interested - keep reading this blog for more details. I'm also planning a review on a recent addition to my crudy - a Nellie's Stamping Buddy Pro Magnetic Platform for Rubber and Clear Stamps which my husband very kindly bought me as an early Christmas present. I really wanted a Tim Holtz stamping Platform which is about twice the price of the one I've got instead and also huge beyond use in all honesty especially as I work in a space roughly the size of a sheet of A4 paper - huh I always assumed the Tim Holtz platform was 12" x 12" because it seems really large on YouTube videos but I've just gone on eBay to check and it's only 8" x 8", that's not much bigger then the one I've got! I am so glad Chris got me this one instead of paying £30 (with change) for the one I really thought I wanted - what a rip off!! (The stamping area of the Nellie's one is 7.5" x 9") A proper review will follow once I've had a good chance to use it.

We are now well on our way to Christmas and as always I'm not as far along with my Christmas card/gift making as I should be so I might not be updating as often as I would like. I will try to post more updates once I've got myself more organised and hopefully I'll have a card to share in the next couple of days because I have a few birthdays coming up next week. Michele and I have decided to have a break from challenges for a while but we hope to resume them in the New Year (I sense a resolution!) but don't let that stop anyone from sharing a link to cards and projects you've made in the meantime. You can leave a link in the comment section to your blog or if you don't have one feel free to get in contact with me using the form in the sidebar and we can find a way to add your photos to the blog or just share them with me if you are shy - I love seeing what people are making.

Until next time - keep crafting!

Love and crafty hugs,

Sarah xxx

Thursday 2 November 2017

Just keeping in touch

Hello crafty peeps and welcome to my crafty nook! I hope you are all well and having a great week. It's very cold here in my crafty nook and it will be for nearly another week! I got a phone call today from the gas company to say that they'd got the asbestos report and they'd be coming to put in our new heating system on Monday, it's going to take two days to complete, 1 1/2 to replace the boiler etc then another half day for the electrician to wire the boiler in but hopefully by this time next week we'll have a warm flat and hot water for the first time in two weeks! I am very much looking forward to it, cold is very motivation sapping and I've not done very much apart from huddle under blankets since it turned cold at the weekend. Now that we've finally got a start date, we can get on with moving the rest of the stuff that needs doing. There wasn't much point doing it before because of all the space it's going to take up. We need floors to be as clear as possible for as long as possible because of my husband's sight limitations so I've been putting it off until we'd got a fixed date.

As well as an update, I thought I'd share a couple of cards I've made since the last proper post. The first card is a watercolour sympathy card that I made for someone I know from church (I don't attend now but was a very active member of the Methodist Church before I got married). As a fellow Christian, I considered a faith based sympathy card to be appropriate on this occasion.


All the stamps used came from a Heartfelt Creations set called HCPC 3450 - Cross and Lilies Pre Cut Set which coordinates with the Cross and Lilies Die (which I don't own unfortunately). They are cling mounted red rubber stamps and have some beautiful sentiments included - the two I didn't use on this card were 'With Heartfelt Sympathy' and a very swirly 'Hugs'. I like Heartfelt Creations stamps a lot but the one drawback with them is it's quite hard to line them up straight if you are using them directly on your card because they are not printed on the back like a lot of my stamps are. My images are a bit wonky but I hope that doesn't distract from the message I want to convey. I stamped the cross image and added touches of paint to the lilies using Kuretake Gansai Tambi watercolours - the 36 pan set and the starry night set of 6. Once the lilies were dry, I stamped the image onto a post-it note and fussy cut around it on the outline to make a mask for the cross. I added this onto the image and flicked the A6 card with a watered down version of the gold paint used to colour the centre of the lilies then allowed that to dry before repeating the paint splatters with black paint. I removed the mask, allowed the splatters to dry then completed the card as shown. Although it very 'on trend' to use paint splatters on watercoloured cards, this wasn't the reason why I chose to use this technique. The cross looked a bit lost on all the white background, I didn't want to add patterned paper to a fussy cut out cross or to have a solid watercoloured background so adding subtle splatters of paint seemed like a good way to bring the cross into the foreground while adding a bit of extra interest to the background. I think it works.

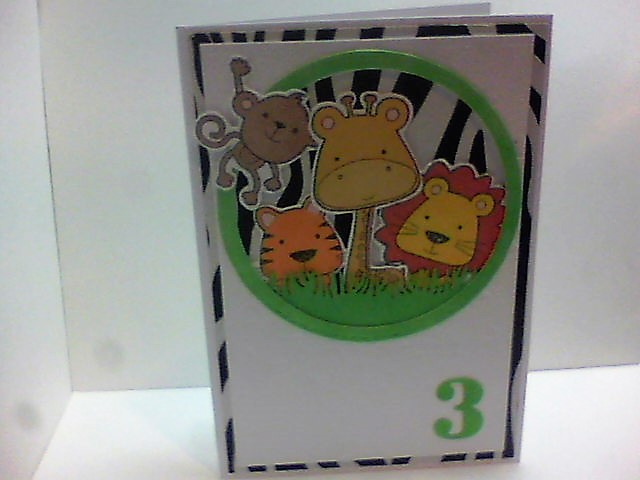
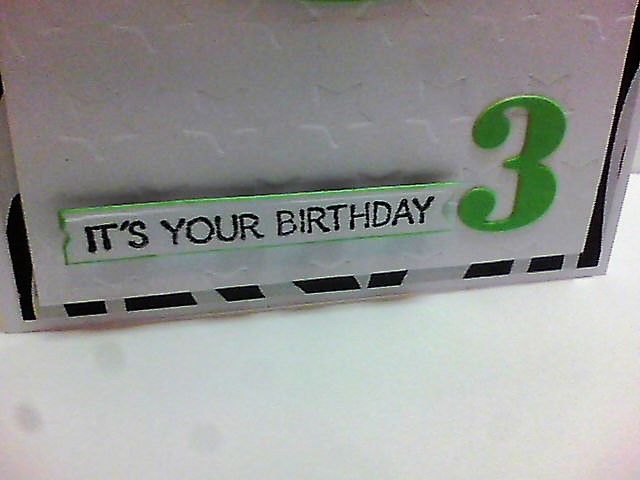
My second card is the one I made for my niece who celebrated her third birthday last Friday. I hadn't made a card for her in advance though at one point I did make the panda card featured in another post with her in mind but considered it to be a bit menacing in appearance and never got around to making a less scary version. So I ended up making her a card while stripping two rooms and re-arranging the living room to accommodate all the stuff from both rooms. Luckily I sometimes stamp images, colour them and fussy cut around them ready for future projects (I store them in either DL sized plastic wallets or A5 sized plastic wallets - Poundland or The Works are good place to pick them up cheaply) and this is what I used to make a (fairly) quick card for Isobel. The Safari images came from a Freebie from Papercraft Essentials magazine earlier in the year called 'Safari Friends'. I fell in love with this embossing folder and stamp set the moment I saw it but up to now hadn't used it for a card apart from cutting out a couple of sets of each image (there are a boy and girl explorer included as well as lots of sentiments and scene building stamps)


The first few photos are the ones I took before adding the sentiment, I'd die-cut some grass at some point and added it to the folder with the other images so I decided to add it in front of the animals as they peer through the die cut circle of the front panel. I embossed the panel using a star embossing folder by Me to You (Tatty Teddy) but used the debossed side for a different textured look. The stitched frame was made by layering two stitched circle dies together and running them through the die cutting machine at the same time - it was die cut out in white and coloured using the Grass Flexmarker - the 3 was coloured using the same pen. The Zebra print card came from my stash, I think it may have come from The Works or possibly Yorkshire Trading - it's a pack of different coloured and designs of animal prints and is usually to be found in the kids stationery/craft section. I've had it for a few years but I'm sure similar card can be picked up cheaply enough from either the shops mentioned or other places - I seem to recall seeing some animal print card in the kids craft section of Tesco a few years ago too. The sentiment on the front was one from the stamp set and was cut out using a flagged end die from my stash. I ran the green flexmarker around the edge to make it stand out from the background piece. I added the 'Go Bananas!' sentiment to the inside and stamped a banana three times as shown to make a bunch of them next to the sentiment and coloured them in using a couple of Flexmarkers. I really like how the brown adds that hint of realism to them.

I hope you like my latest makes, again I'm probably not going to have much time to do a lot of crafting for the next couple of weeks until we've got the new heating system up and running and I've got all my craft stash back in place (it'll probably be quite traumatised by all the moving about lol!) I have been taking this time to re-evaluate both the extent of my craft stash (huger than I'd realised - it's amazing how much I'd crammed into such a small space!!!) and how I've been storing it. I'm not exactly a hoarder or OCD (getting there though!) but I do like to have things a certain way and part of that up to now is leaving things in the original packaging. Part of that is practical, it keeps things protected and has all the relevant information already there without the need to duplicate it but what I hadn't realised was quite how much room some of the packaging takes up. So while things are out and a little bit more accessible, I've been taking baby steps and I've put a lot of the packaging into recycling. I started with all my Tonic Studio punches (I have a lot of quite bulky ones because Every Craft's A Pound had them for you guessed it a pound each!) Just by taking all but one of them out of the plastic packaging, I managed to reduce a large wicker basket overflowing with punches (I found two punches by the side of where they were stored because there were so many that they'd fallen out and I hadn't noticed) to a medium sized narrow plastic box with a lid and a carry handle which will be easier to transport and store. I had two Tesco bags for life filled with the plastic by the end of it and I kept the cardboard inserts so I could tell what each punch was called for blog posts etc. So encouraged by this that I've started to do the same with my embossing folders - I've kept the ones that are in card and cellophane packaging as they don't take up that much more room and I seem to think I have some Verity Rose embossing folders that may still be in their packaging but all the others are now out of the original packaging and I've written the brand/name/size onto the actual folder so I still have the information for blog posts etc. I cut down some of the plastic packaging for making shaker cards and for floating elements but put the rest for recycling and I kept some of the Crafter's Companion card inserts to use as medium weight chipboard but again the rest went to be recycled. I've reduced two open top storage boxes to just one. I've also gone through an A4 plastic wallet folder that was bursting with scraps of patterned paper and reduced it to 8 items - some of the ones in the folder had been in there over ten years!! These are only small steps and in themselves probably make very little difference but it's a start, not just to having a more usable craft space but a whole new mindset. I know why I have problems letting go of stuff, some of it is sentimental - I'm reluctant to get rid of things that people have bought me even if I don't really like them or use them - another issue is when I started crafting, I had very little money to buy things (my heat gun which until earlier this year was still in it's original packaging cost £19.99 and that was 16 years ago!) and they were quite hard to get hold of.  That might sound strange when you consider how accessible craft items are these days what with a plethora of  online craft shops and eBay, but when I started physical craft shops weren't really that common especially in medium sized towns like I lived in and I'd never even heard of internet shopping. We did have a craft shop for a while (we had two different ones at different times) but the items were really pricy in the first one and by the time the second one opened I had less spare cash to spend on things. The point I'm trying to make is because at one time I had a hard time getting craft stuff, I'm reluctant to get rid of any of mine just in case I end up 'needing' it at some point in the future even though some of it is either not to my taste anymore or I've outgrown it as I've become more skilled at papercrafts (I rarely use card kits these days for example). I don't want to make any promises I can't keep so I'm not going to promise that my craftroom is going to become a beautifully organised space with considerably less items in then there are at present, but what I am going to say is that change is coming - and change is good!

Well that's been a very long blog post - well done if you've made it to the end.As always if you have any questions or comments then please leave them in the usual places. I'm not sure when I'll have something new to share but hopefully I'll be back crafting (ready for the Christmas run up) in the next week or two so until next time - keep crafting!

Love and crafty hugs,

Sarah xxx

Tuesday 24 October 2017

ARGGGGHHHH!

Hello crafty peeps and welcome to my crafty nook! I hope you are all have a good week so far. I'm just writing to let you know that I may be MIA for a while. We had the gas engineer come today to inspect the boiler and our gas cooker and to be honest I was half expecting him to condemn our cooker which is rather old and has developed a few small holes in it's base inside the oven (so convinced was I that this would happen, I went and ordered a mini oven from Aldi so if the worst came to the worst, I'd still be able to make some kind of Christmas dinner in a few months time!) however what I wasn't expecting was for the boiler to be condemned in it's place. In it's self that's not a bad thing in fact it'll be great to actually have boiling water without having to waste 20 litres of water before it even gets warm and if the boiler had to be replaced now while the weather is still relatively warm is a good time to do it but unfortunately the boiler isn't the only thing that's going to be replaced, the entire heating system is going to be. That means every radiator in the flat has to be easily accessible and an asbestos survey has to be carried out prior to that. That probably doesn't sound like a big deal but we have a heck of a lot of stuff in a fairly smallish flat with very little storage - in fact the one room that does have the storage space is the utility room where the boiler is located. I have two days to get all the radiators accessible ( at present there's the one in the bathroom free and that's it - even the hall one has the laundry bin in front of it!). The kitchen's not too bad, all I've got to do is move the table from one side of the room to the other (and clear any crap that's hidden itself underneath there - not literal crap, I'm not that BAD a housewife!!), the hallway stuff can go in the bath for now but the two biggest challenges are the two bedrooms. My side of the bed is currently covered with the contents of the airing cupboard which I'll transfer to the sofa for now, but the radiator is under the window at Chris's side and that's going to involve some serious furniture humping and trying to figure out where it can all go (on the communal landing is one option - our next door neighbours certainly have enough stuff out there!) but the worst room is going to be the second bedroom, my craftroom AKA The Crudy! I've been crafting for many years and I'm a craft hoarder - I have a heck of a lot of stuff and it's all crammed into a space barely big enough to fit a single bed and a set of drawers in. I have stuff in boxes stacked on top of other boxes and I really don't know where I'm going to put it all and still leave the radiators exposed. So instead of spending my birthday crafting, watching DVDs and having a home pamper session like I'd planned, I will be running myself ragged more than likely with not even a nice birthday meal or even cake to look forward to.

The asbestos survey is on Friday between 9am and 11am (originally they wanted to do it TOMORROW!!!) and the gas fitters are also coming to measure up the radiators etc at some point on Friday too. I'm not sure how long everything is going to take (if they find asbestos we may have to move out for a bit - I'm praying hard that they don't!) and even once the work's been completed there's all the aftermath to take care of, we might need to re-decorate some rooms depending on how much damage is caused by them replacing the radiators and pipes which will mean even more delays. It's not really practical to try crafting with my supplies scattered to the four corners of the flat so I'm not sure when I'll be making stuff again. It's a real possibility that I won't be able to take part in this month's challenge but I will blog Michele's makes if she's agreeable.

I hope you'll stick with me and keep visiting my blog for any updates. Not sure when I'll blog next but until next time - keep crafting!

Love and crafty hugs,

Sarah xxx

Monday 23 October 2017

A couple of cards to share

Hello crafty peeps and welcome to my crafty nook! I hope you are all well and have had a good weekend - it was very blustery here but it's calmed down now thank goodness. It's been a couple of weeks since my last post but I've not been up to a great deal craft wise. One of my niece's celebrated her 19th birthday on the 16th and my lovely crafty friend Michele sent me some gorgeous planner stamps and sticky note sets through the post which was a wonderful surprise and I'm still at the stroking and smiling stage (I can't be the only one who takes forever to use new goodies because if you use them they won't be new anymore??) and haven't used them yet though I'm 'planning' on using them soon! I made Michele a thank you card which I'll be sharing in this post. First of all let me apologise if any typos slip through, I'm writing this in the early hours of Monday and my beloved cat has decided that he can't sleep anywhere but in my arms which makes typing very challenging - still it makes a change him sleeping this close to the floor as he's taken to jumping on top of the lounge door and going to sleep up there. It would be cute if it wasn't for the fact that he's 16 years old and sleeps very deeply - the daft thing keeps going into a deep sleep then falling off the door which is rather scary and I'm terrified he's going to break something! I'm sure the only reason he goes up there is so he can look down on his inferior humans (cats rule!)

Anyway enough of high Jinx *winks* let's get back to crafting! The first card I'd like to share is the one I made for my niece. I wasn't really sure what to make her as 19 is one of those between ages if you know what I mean plus she's going to have a baby in December and a lot of the teen stamps I own just didn't seem suitable. In the end I decided to use some Forever Friends papers which included some cute cut apart images in the A5 paper pack.

Love the Rose Gold Foiling that's on the cut aparts.

Forever Friends cut apart and backing paper with added bling

Inside of the card with die cut Special sentiment - stamps are CC

The back of the card featuring another of the cut apart images and a handstamped warning lol

Envelope made with Trimcraft Pick n Mix papers and WRMK envelope punch board

The front of the card seemed a little 'meh' so I added some Autumn sequin mix from Craft Stash, where I was a bit messy with the glue I added blobs of Dovecraft glitter glue in Rose.

Here is the Thank you card I made for the wonderful Michele.

Love this stamp set from eBay but it needs some bling!

Blinged up using Gold paint and a very small brush!

Isn't that a lovely sentiment?

Michele is a star so I added some to the inside


Envelope made using the WRMK envelope punch board and Trimcraft Sweet Paris paper


I really like the stamp set, it's an unbranded one from eBay and has some sweet sentiments with it as well as the two large floral stamps used on this card. Although it looks great just in black and white, I wanted to 'bling' it up a bit so added some highlights using Kuretake Gansai Tambi Starry Colors (sic) paints - I think I used the third from the left out the six gold paint pans. It's a very pigmented water colour and adds just the right touch of glitz to the front. I had some left on the paint brush so painted a couple of die cut scribble stars to add to the inside as shown. I stamped everything using Versafine black ink which is waterproof but more importantly,  a really dark black.

I've had a bit of lovely crafty news this week but I'm not sharing it until after Christmas (aren't I a craft tease! lol) Hopefully I should have a few cards to share with you later in the week, one unfortunately is a sympathy card but the other will be a cute card for a three year old as it's my youngest niece's birthday on Friday. I may even have a few craft goodies to share as it's my birthday on Wednesday and I'm hoping for some birthday money (I've already been lucky enough to be given some from my lovely mum) I'm torn between getting some Nuvo alcohol ink pens which are exceedly cheap at Craft Stash or buying a couple of items from the new Christina Griffith Card Making Magic Collection which is gorgeous and exclusively available at Craft Stash. I've already got my present from my wonderful hubby (a new Sizzix Big Shot machine which I don't want to use until Wednesday!) and I'm very grateful for it because my old one is really hard to use (it doesn't cut through in places unless I use shims). If you have any questions or comments then please leave them in the usual places and until next time - keep crafting!

Love and crafty hugs,

Sarah xxx